privacyIDEA 免費的多因子 OTP 驗證教學

PrivacyIDEA 為各種應用程式:包括 SSH、VPN、Apache2、NGINX、Microsoft NPS server...等,提供兩因素身份驗證,從而提高現有應用程式的安全性,它在 Linux 上運行,完全開源,並根據 AGPLv3 授權。
作業系統:Ubuntu 22.04 LTS
切換到 root
$ sudo -i
確認 Ubuntu 版本
# lsb_release -a
No LSB modules are available.
Distributor ID: Ubuntu
Description: Ubuntu 22.04.3 LTS
Release: 22.04
Codename: jammy
下載簽名密鑰
# wget https://lancelot.netknights.it/NetKnights-Release.asc
驗證指紋
# gpg --import --import-options show-only --with-fingerprint NetKnights-Release.asc
添加簽名密鑰
# mv NetKnights-Release.asc /etc/apt/trusted.gpg.d/
將 jammy/22.04 LTS 添加存儲庫 /etc/apt/sources.list.d
# add-apt-repository http://lancelot.netknights.it/community/jammy/stable
Press [ENTER] to continue
中途有跳出 404 Not Found [IP: 46.4.108.34 80] 可忽略
# apt update
安裝 privacyIDEA 、 freeradius 套件
# apt install privacyidea-apache2
# apt-get install privacyidea-radius
輸入 admin 密碼
# pi-manage admin add admin -e admin@localhost
開啟瀏覽器,輸入 https://ip ,入口網站上,輸入 admin 及密碼

詢問是否建立預設領域 (Create default realm),選擇 No

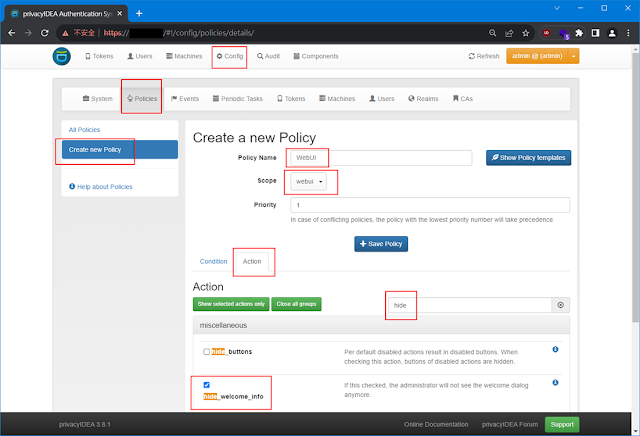
Config → Policies → Create a new Policy


Resolver name:resolver1
File name:/etc/privacyidea/privacyidea_user


priority 設成 1


Config → System → SMTP servers → New SMTP server


# /opt/privacyidea/bin/privacyidea-create-pwidresolver-user --help
新增 2 個 user 範例:
# /opt/privacyidea/bin/privacyidea-create-pwidresolver-user -u 帳號 -i 10 -p 密碼 -d '描述' > /etc/privacyidea/privacyidea_user
# /opt/privacyidea/bin/privacyidea-create-pwidresolver-user -u 帳號 -i 11 -p 密碼 -d '描述' >> /etc/privacyidea/privacyidea_user
# cat /etc/privacyidea/privacyidea_user

Users 內就會看到這2個帳號

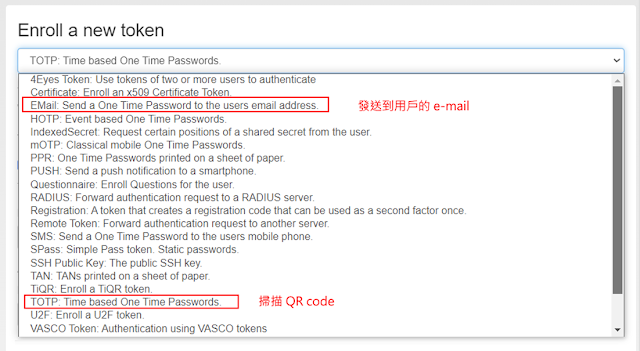
開放 user02 進行二次驗證,進入 user02,點 Enroll New Token 註冊新令牌


到 Tokens 上,會看到一組 Serial

查看資訊

# vi /etc/freeradius/3.0/clients.conf
新增 用戶端設備,範例為 Palo Alto 防火牆設備
client palo_alto {
ipaddr = xxx.xxx.xxx.xxx
secret = pasecret123
}

重啟服務
# systemctl restart freeradius.service
Config → Policies → Create new Policy

切換到 Action
Please check e-mail and enter OTP Code

I think you just received a OTP
{otp} is the OTP you received


然後點最底下的 Save

輸入以下指令,檢查 Reply-Message 值,出現 Please check … 就代表回傳成功了
# radtest user02 123456 localhost 1812 testing123

本機帳號完成後,可以決定是否要刪除掉,畢竟要給Client 端固定一組密碼是很不安全的,接下來就是結合LDAP Server 來做帳密驗證
Config → Users → New ldapresolver

使用 Windows Active Directory 來做驗證


Users 就會全部同步進來


Palo Alto 防火牆 GlobalProtect VPN 2FA 設定


帳號驗證直接走 RADIUS ,本地使用者不需要建立及啟用帳號。


參考網址:https://privacyidea.readthedocs.io/en/latest/installation/ubuntu.html


留言