發表文章

目前顯示的是有「Linux」標籤的文章

Graylog 安裝架設

圖片
這是一套免費開源Log收集分析系統,可以自訂過濾器、報表,並且發送警告通知mail,以下記錄相關安裝設定方式 作業系統 Ubuntu 22.04 # apt-get update && sudo apt-get upgrade 安裝 Java 11 # apt-get install apt-transport-https openjdk-11-jre-headless uuid-runtime pwgen 安裝 MongoDB 建議安裝 6.0 版比較不會有問題 # curl -fsSL https://www.mongodb.org/static/pgp/server-6.0.asc | sudo gpg -o /usr/share/keyrings/mongodb-server-6.0.gpg --dearmor # touch /etc/apt/sources.list.d/mongodb-org-6.0.list # echo "deb [ arch=amd64,arm64 signed-by=/usr/share/keyrings/mongodb-server-6.0.gpg ] https://repo.mongodb.org/apt/ubuntu jammy/mongodb-org/6.0 multiverse" | sudo tee /etc/apt/sources.list.d/mongodb-org-6.0.list # apt-get update # apt-get install -y mongodb-org # systemctl start mongod.service # systemctl enable mongod.service 初始化系統 # ps --no-headers -o comm 1 使用 mongo shell 測試 # mongosh test> show dbs test> use config config>exit 裝 Elasticsearch  (不支援最新 8.13.4) 警告:  Graylog 不支援 Elasticsearch 7.11 或更高版本。不要升級 Elasticsearch,因為這樣做會破壞您的執行個體! # wget ht...

NextCloud 安裝架設

圖片
OS 環境:Ubuntu 22.04 並安裝 Docker (本篇架設服務皆只使用同一台主機) DNS 網域名稱:nc2.domain.com.tw 和 collabora.domain.com.tw IP:10.1.1.1 下載官方 yml 格式 # mkdir nextcloud # cd nextcloud # curl -f -L https://github.com/nextcloud/docker/raw/master/stack.yml -o docker-compose.yml 修改內文如下: version: '3.2' services:   db:     image: mariadb:10.6     restart: always     volumes:       - db:/var/lib/mysql     environment:       - MYSQL_ROOT_PASSWORD=123456       - MYSQL_PASSWORD=123456       - MYSQL_DATABASE=nextcloud       - MYSQL_USER=nextcloud   redis:     image: redis:alpine     restart: always   app: #    image: nextcloud     image: nextcloud:27.1.5     restart: always     ports:       - 8080:80     volumes:       - nextcloud:/var/www/html     environment:       - RED...

Rainloop 安裝設定

圖片
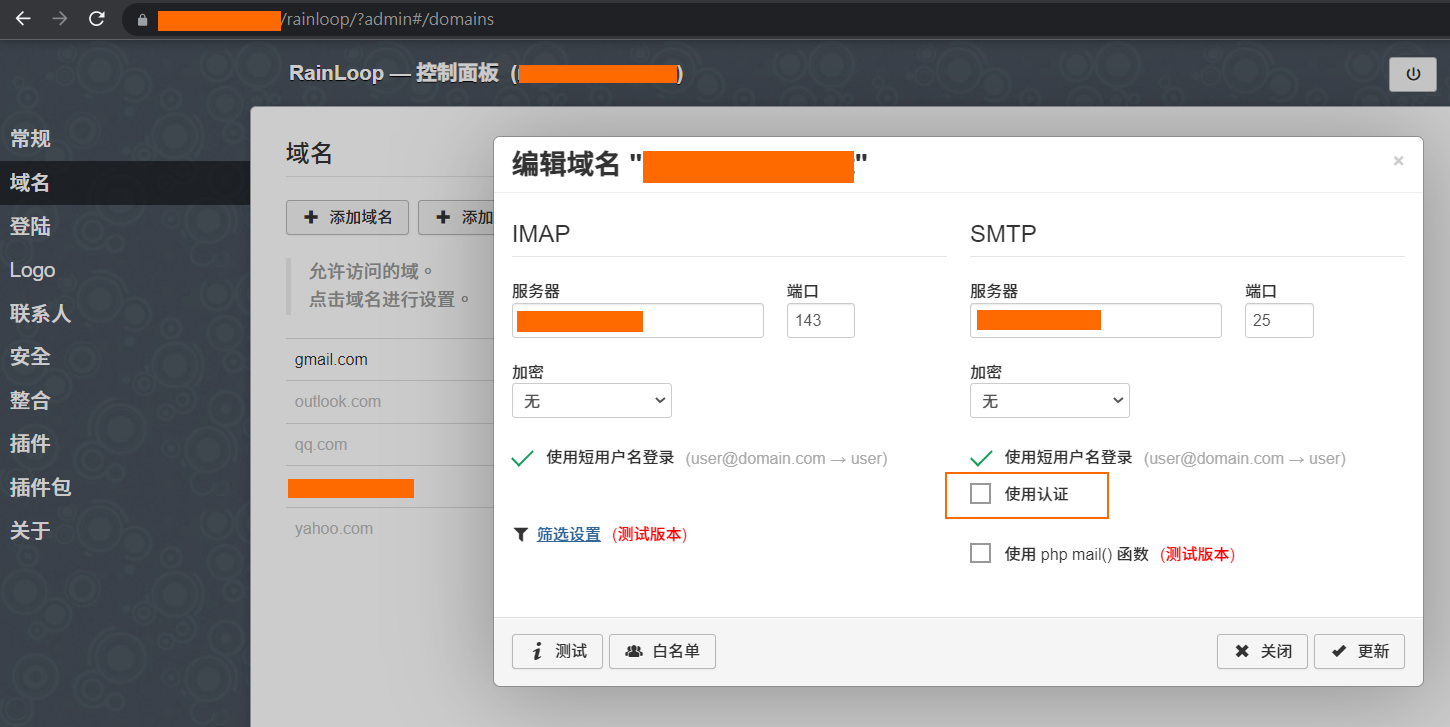
Rainloop 是套簡單、現代化的免費 WebMail Client,以下進行安裝教學: OS:Ubuntu 22.04 + XAMPP套件 前置作業,要先安裝好郵件系統:Postfix、Dovecot # sudo apt install postfix # sudo apt install dovecot-core dovecot-imapd # sudo apt install dovecot-pop3d 確認服務是否正常 # systemctl status postfix.service # systemctl status dovecot.service 下載 rainloop # wget https://www.rainloop.net/repository/webmail/rainloop-latest.zip 解壓縮到 xampp 的網頁目錄內 # sudo mkdir /opt/lampp/htdocs/rainloop # sudo unzip rainloop-latest.zip -d /opt/lampp/htdocs/rainloop 設定資料夾和檔案權限 # cd /opt/lampp/htdocs/rainloop # sudo find . -type d -exec chmod 755 {} \; # sudo find . -type f -exec chmod 644 {} \; # cd .. # sudo chown -R daemon:daemon rainloop 開啟瀏覽器輸入以下網址,進入管理員設定 https://你的網域/rainloop/?admin 帳號:admin 密碼:12345 先添加域名,輸入IMAP、SMTP伺服器名稱後,打勾【使用短用戶登錄】,然後取消掉【使用認證】,設定完成後,登出 改登入一般用戶,帳號要帶@+網域名稱,進去後就可以看到收件箱的信件了。

如何在 SSL Labs 上獲得 A+ 等級分數

圖片
 Qualys SSL Labs 可以檢測網站的HTTPS配置和評分級別,藉由等級區分,讓管理者清楚地了解網站在安全性上是否有需要改善或提升的地方,好讓網站更加安全、可靠與被信任。 XAMPP Apache 在設定完 SSL 憑證後,到 SSL Labs 去做掃描,卻只拿到 B 等級 以下示範如何獲得 A+ 等級 $ sudo vi /opt/lampp/etc/extra/httpd-ssl.conf 將下行註解掉 # SSLCipherSuite HIGH:MEDIUM:!aNULL:!MD5 然後新增以下: # - Try ciphers in the order listed. Try the strongest ciphers first until a compatible one is found. SSLHonorCipherOrder on # - Allow only strong TLS SSLProtocol -ALL +TLSv1.2 +TLSv1.3 # - TLSv1.3 Settings SSLCipherSuite TLSv1.3 TLS_CHACHA20_POLY1305_SHA256:TLS_AES_256_GCM_SHA384 # - TLSv1.2 Settings SSLCipherSuite TLS_CHACHA20_POLY1305_SHA256:ECDHE-RSA-CHACHA20-POLY1305:ECDHE-ECDSA-CHACHA20-POLY1305:DHE-RSA-CHACHA20-POLY1305:PSK-CHACHA20-POLY1305:ECDHE-PSK-CHACHA20-POLY1305:DHE-PSK-CHACHA20-POLY1305:RSA-PSK-CHACHA20-POLY1305:DHE-RSA-AES256-GCM-SHA384:DH-RSA-AES256-GCM-SHA384:DHE-DSS-AES256-GCM-SHA384:DH-DSS-AES256-GCM-SHA384:ADH-AES256-GCM-SHA384:TLS_AES_256_GCM_SHA384:ECDHE-ECDSA-AES256-GCM-SHA384:ECDH-ECDSA-AES256-GCM-SHA...

使用 XAMPP 架設SSL網站

圖片
先將 XAMPP  for Linux 安裝包架設起來,接著申請免費憑證步驟如下:  到 SSL For Free  註冊,建立新憑證  將產生的 xxxxx.txt 下載下來並複製到 /opt/lampp/htdocs/.well-known/pki-validation  確認瀏覽器是否可以讀取到該網址的 xxxxx.txt  頒發憑證後,將三張憑證放置在 httpd-ssl.conf 所設定的目錄內,如下: # sudo vi /opt/lampp/etc/extra/httpd-ssl.conf SSLCertificateFile "/opt/lampp/etc/ssl.crt/certificate.crt" SSLCertificateKeyFile "/opt/lampp/etc/ssl.key/private.key" SSLCertificateChainFile "/opt/lampp/etc/ssl.crt/ca_bundle.crt" 將網站從 HTTP 自動導向 HTTPS # sudo vi /opt/lampp/etc/httpd.conf 檢查 mod_rewrite.so 模組是否已經載入 LoadModule rewrite_module modules/mod_rewrite.so 在文件結尾,增加以下內容: RewriteEngine On RewriteCond %{HTTPS} off RewriteRule (.*) https://%{HTTP_HOST}%{REQUEST_URI} 重新啟動 xampp 服務,檢查網站就會自動導向 https 了 後續記得每90天憑證過期前,要到 SSL For Free 展延憑證。 後記: 在 SSL For Free 註冊的憑證 Renew 2次後,第3次就要付費了 查了網路文章,得知ZeroSSL、SSL For Free、Let's Encrypt 這三者關係如下圖: Let's Encrypt 的Getting Started頁面也推薦使用 Certbot 先更新套件 $ sudo apt-get update $ sudo apt-get -y dist-upgrade 安裝套件 $ sudo ...

FreeRADIUS Server 架設 for Rocky Linux 8.6

圖片
廢話不多說,此版本完全照著做,就可以透過802.1x 進行無線網路驗證,只是驗證的是user這個檔案的帳號清單,有點雞肋,有空再來補一篇 Join AD Domain 文章。  # dnf -y install httpd php # dnf -y install php-{cli,curl,mysqlnd,devel,gd,pear,mbstring,xml,pear} # pear install DB # pear install MDB2 # yum install mariadb-server # systemctl start mariadb # systemctl status mariadb # systemctl enable mariadb.service # mysql -u root 設定root密碼 MariaDB [(none)]> update mysql.user set password=password('123456') where User="root" and Host="localhost"; MariaDB [(none)]> flush privileges; MariaDB [(none)]> CREATE DATABASE radius; MariaDB [(none)]> GRANT ALL ON radius.* TO radius@localhost IDENTIFIED BY "StrongradIusPass"; MariaDB [(none)]> FLUSH PRIVILEGES; MariaDB [(none)]> quit 安裝 FreeRADIUS 套件 # dnf install -y freeradius freeradius-utils freeradius-mysql # systemctl enable --now radiusd.service # systemctl status radiusd.service # firewall-cmd --add-service=radius --permanent # firewall-cmd --reload # mysql -u...

寫一個 PHP 網頁上傳範例

圖片
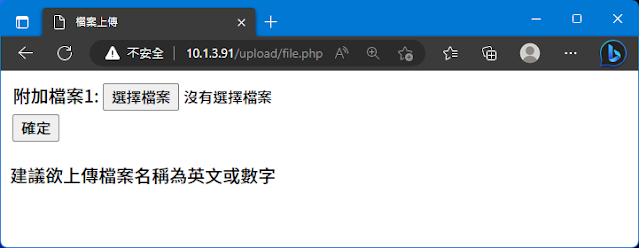
請先關閉 SELinux # yum install php # vi /etc/php.ini upload_max_filesize = 1000M post_max_size = 1000M max_execution_time = 36000 # md /var/www/html/upload # cd /var/www/html # chmod -R 777 /var/www/html/upload # chown apache:apache /var/www/html/upload # cd /var/www/html/upload # firewall-cmd --add-service=http --permanent # firewall-cmd --reload # vi file.php 程式碼: ------------------------------------------------------------------------- <html>  <head>  <meta http-equiv="Content-Type" content="text/html; charset=utf-8" />  <title>檔案上傳</title>  </head> <body>  <form action="file.php" method="POST" enctype="multipart/form-data" name="form1" id="form1"> <table> <tr> <td align="left"> <?php $fileNum=1; for($i=0;$i<$fileNum;$i++){?> <p>附加檔案<?php echo $i+1;?>:     <input type="file" name="file[]" /> </...

Linux issue 顏色配置設定

vi /etc/issue ^[[ 第一個^[是按 ctrl+v 得到的,第二個是普通的[ ^[[32;01mCentOS release^[[33;01m 5.6^[[35;01m (Final)^[[m ^[[36;01mKernel \r on an \m^[[m IP (eth0): ^[[31;01m 172.16.10.116 ^[[m CentOS release   5.6   (Final) Kernel \r on an \m IP (eth0):   172.16.10.116 command line ps1 設定 PS1='[\[\033[1;33m\]\u\[\033[1;37m\]@\[\033[1;32m\]\h\[\033[1;37m\] \[\033[1;31m\]\W\[\033[0m\]]\[\033[1;36m\]\$ \[\033[0m\]' [ root @ localhost ~ ]#

CentOS 5.5 VPN PPTP架設

到 RPM PBone Search 網站搜尋 pptpd 找到 CentOS 版本下載 # wget ftp://ftp.pbone.net/mirror/rpms.arrfab.net/centos/5/i386/pptpd-1.3.3-1.i386.rpm # rpm -ivh pptpd-1.3.3-1.i386.rpm ------------------------------ # vi /etc/pptpd.conf option /etc/ppp/options.pptpd localip 192.168.8.1 remoteip 192.168.8.100-105 請註解掉下行,不然會出現Error 619無法連線(有Bug) #logwtmp ------------------------------ 新增VPN使用者登入帳號及密碼 # vi /etc/ppp/chap-secrets user   *   passwd   * ------------------------------ # vi /etc/ppp/options.pptpd DNS 伺服器  (重要) ms-dns 168.95.1.1 區域網路中 wins 伺服器所在位置,通常是 AD 主機或 samba 主機 ms-wins 192.168.0.1 ------------------------------ 開啟封包轉送 # vi /etc/sysctl.conf net.ipv4.ip_forward = 1 ------------------------------ 新增iptables防火牆規則 (可寫在/etc/init.d/rc.local) # /sbin/iptables -A INPUT -p tcp --dport 1723 -j ACCEPT # /sbin/iptables -A INPUT -p tcp --dport 47 -j ACCEPT # /sbin/iptables -A INPUT -p gre -j ACCEPT # /sbin/iptables -t nat -A POSTROUTING -s 192.168.8.0/24 -o eth0 -j MASQUE...

iptables DMZ 設定實作

圖片
實作平台: CentOS 5.5 eth0  (外網) IP: 123.95.10.55 Mask: 255.255.255.0 GW: 123.95.10.254 eth1  (內網) IP: 192.168.1.1 Mask: 255.255.255.0 eth2  (DMZ) IP: 192.168.4.1 Mask: 255.255.255.0 ------------------------------------------ 輸入setup 設定防火牆 將eth0 eth1 eth2 信任的裝置(Trusted)和偽裝裝置(MASQUERADE) 全都打勾 儲存離開 vi /etc/sysctl.conf 修改成1 net.ipv4.ip_forward = 1 清除規則 iptables -F iptables -X 開機自動執行 vi /etc/rc.d/rc.local ------------------------------------------ 內網 可以連進 DMZ iptables -A FORWARD -s 192.168.1.0/24 -d 192.168.4.0/24 -i eth1 -j ACCEPT ------------------------------------------ 外網 無法連進 內網 iptables -t nat -A PREROUTING -s 123.95.10.55 -d 192.168.1.0/24 -i eth0 -j DROP ------------------------------------------ 外網 連進 DMZ 的http伺服器主機 iptables -t nat -A PREROUTING -p tcp -i eth0 --dport 80 -j DNAT --to 192.168.4.10:80 ------------------------------------------ DMZ 無法連進 內網 iptables -t nat -A PREROUTING -s 192.168.4.0/24 -p all -d 192.168.1.0/24 -j DROP 或是以下三條 iptables -t nat -A PREROUTING -...